13
CONSTRUCTING FLOORS

The rooms we built with the buildRoom() function in Chapter 12 are useful, but they won’t keep the rain out. In this chapter, we’ll write a buildFloor() function to build floors and ceilings, and we’ll also write a buildfloor program to call that function. We’ll use one function to build floors and ceilings because a ceiling is just a floor built higher up, as shown in Figure 13-1.
The algorithm we’ll use to build floors will move a turtle across a rectangular area and make the turtle perform an action at every space. In this chapter, the turtle will place a block at every space in the rectangular area, but this flexible algorithm can perform many tasks. For example, in Chapter 14 we’ll use this algorithm to write a farm program that plants seeds at every space in a rectangular area. Using a flexible algorithm instead of hardcoded solutions allows you to use the same code to solve a variety of problems!
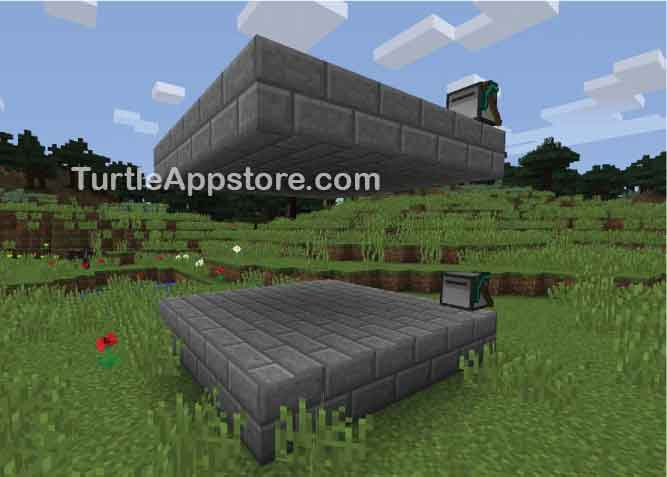
Figure 13-1: The same code that builds a floor can also build ceilings.
DESIGNING THE SWEEPING ALGORITHM
Building a horizontal surface is like building a wall, but instead of moving up after laying out a row of blocks, the turtle will move left or right to the next column. We’ll call the turtle’s action of moving across every space of a rectangular area sweeping, and we’ll call the rectangular area the field.
We’ll write the sweepField() function using an algorithm that has three parameters: length, width, and sweepFunc. The length and width parameters determine the size of the field, as shown in Figure 13-2.
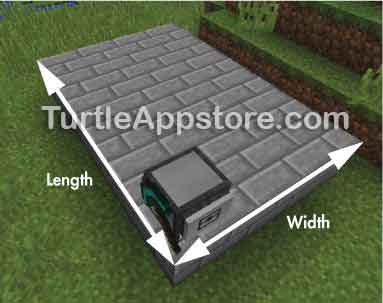
Figure 13-2: The length parameter is the distance in front of the turtle. The width parameter is the distance to the right of the turtle.
The sweepFunc parameter takes a function, which it calls at each space on the field. In the Lua programming language, we can pass functions for parameters, just like values. When the buildFloor() function uses sweepField() to build a floor, it passes a function that places blocks each time the turtle moves to a new space. Because sweepFunc is a parameter and we can pass other functions to it, we can customize sweepField() to instruct the turtle to perform any action we’d like. The focus of this chapter is creating floors, so we’ll examine the algorithm as it’s used in the buildfloor program.
BUILDING THE FLOOR
The buildfloor program will take two command line arguments: length and width. As mentioned earlier, these arguments determine how large the floor will be.
Figure 13-3 shows a top-down view of the path that a turtle will take to lay out a 3 × 4 floor.
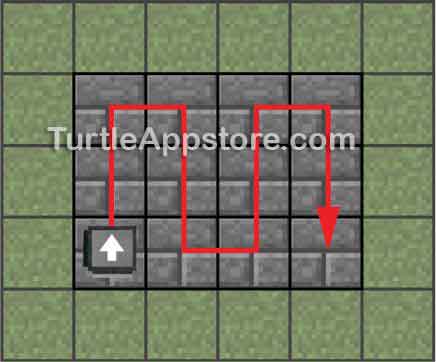
Figure 13-3: The path the turtle will take to sweep a rectangular 3 × 4 floor
To create the floor, the turtle will first move forward along the first column and call a function over each space to place a stone brick under itself. To tell the turtle which function to call, we’ll use the sweepFunc parameter, which we’ll look at in more detail in “Calling the sweepFunc() Function” on page 161. For now, just know that this parameter takes a function that will be called every time the turtle moves to a different position on the rectangular floor. In the buildfloor program, the function passed to sweepFunc is selectAndPlaceDown, which is the function in the hare module that selects the turtle’s next nonempty inventory slot and places the selected block under the turtle. Because the turtle starts at the bottom-left corner, it only needs to move forward length - 1 times as it moves along the first column. This puts the turtle over the last block of the first column, as shown in Figure 13-4.
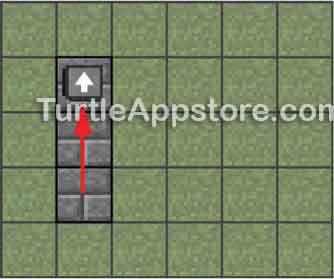
Figure 13-4: After moving forward length - 1 times, the turtle is over the last block of the first column.
To move to the next column and face the correct direction, the turtle must turn right, move forward once, and then turn right again so it will end up in the position shown in Figure 13-5.
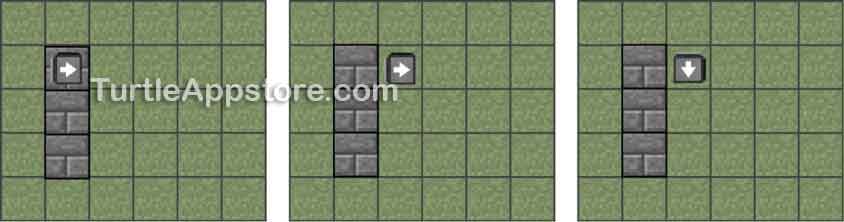
Figure 13-5: The turtle turns right, moves forward, and turns right again to prepare to build the next column.
Now the turtle runs similar code to travel along the next column. It moves forward length - 1 times, calling selectAndPlaceDown at each space to place a block under itself. The result is that there are now two columns of blocks, as shown in Figure 13-6.
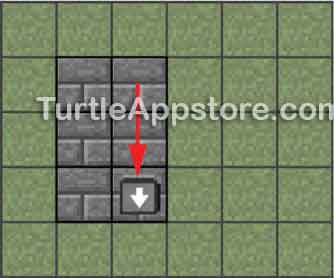
Figure 13-6: The turtle’s position after finishing the second column
At this point, the turtle must turn left, move forward, and turn left again to move to the next column, as shown in Figure 13-7.

Figure 13-7: After the second column is built, the turtle must turn left, move forward, and then turn left again.
The turtle continues moving back and forth along the columns until the number of columns the turtle has completed equals the width of the field. When the turtle is done with this part of the algorithm, it will have created the floor, but its work won’t be finished yet! We might want to run the buildroom program after the buildfloor program to create a room. In this case, we need the turtle to be in the same position and facing the same direction as when it began building the floor. Returning the turtle to its starting position ensures that the walls it builds when we call the buildroom program will align above the floor.
RETURNING TO THE STARTING POSITION
Making the turtle return to its starting position and face its starting direction after sweeping the entire field requires one of two different series of steps, depending on whether the width of the field is even or odd.
If the width is even, the turtle will be on the rightmost block of the bottom row of the floor, as shown in Figure 13-8.
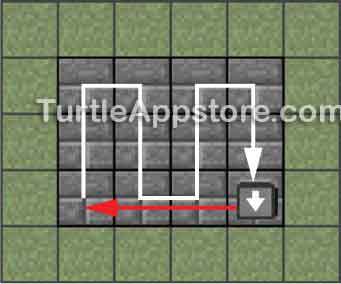
Figure 13-8: The turtle is at the rightmost block of the bottom row when the field’s width is even.
The red line in Figure 13-8 shows the path the turtle must take to return to its starting space and face its starting direction. In this case, the turtle must:
Turn right
Move forward width - 1 spaces
Turn right
However, if the field’s width is odd, the turtle ends up at the top of the field when it’s done placing all the blocks, as shown in Figure 13-9.
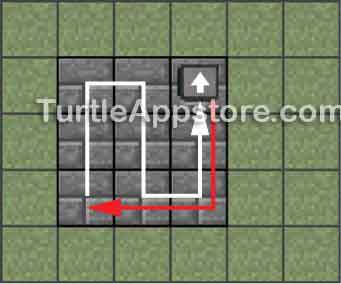
Figure 13-9: The turtle is at the rightmost block of the top row when the field’s width is odd.
The red line in Figure 13-9 shows the path the turtle must take to return to its starting space and face its starting direction. In this case, the turtle must:
Move back length - 1 spaces
Turn left
Move forward width - 1 spaces
Turn right
You’ll program this return behavior in the sweepField() function, but before you learn how to program the sweepField() function, you need to understand how to pass a function to another function.
PASSING FUNCTIONS TO FUNCTIONS
The buildWall() and buildRoom() functions we used in Chapters 11 and 12, respectively, are flexible and can build walls and rooms of any size because they use parameters for the length, width, and height. These parameters allow the functions to make walls and rooms of many different sizes without having to change the source code.
In this chapter, we’ll add the sweepField() function to the hare module and call the sweepField() function in the buildFloor program. Currently, the sweepField() function moves the turtle to sweep over a rectangular field, placing a stone brick beneath itself at each space.
But we can also change the sweepField() function to make the turtle sweep over a rectangular farm to plant seeds and pick up wheat, or we can command the turtle to dig beneath itself to mine a rectangular hole in the ground. The code that makes the turtle move in the sweeping pattern remains the same, but the turtle’s action can change at each space.
The sweepField() function has this flexibility because its sweepFunc parameter is passed a function that it calls as the turtle travels to each space in the rectangular field. In Lua, you can pass functions as arguments, just like you can pass integers or strings. Let’s create a simple example program that passes a function for another function’s parameter. In the command shell, enter edit announce to start a new program, and then enter the following:
announce
1. function hello()
2. print('Hello there!')
3. end
4.
5. function goodbye()
6. print('Goodbye!')
7. end
8.
9. function announce(func)
10. print('About to call the function.')
11. func()
12. print('Function called.')
13. end
14.
15. announce(hello) -- no parentheses after hello
16. announce(goodbye) -- no parentheses after goodbye
After you’ve entered all of these instructions, save the program and exit the editor. You can also download this program by running pastebin get sML2CbZ3 announce.
When you run this program from the command shell, you’ll see this output:
> announce
About to call the function.
Hello there!
Function called.
About to call the function.
Goodbye!
Function called.
The announce() function has a single parameter called func. The first time announce() is called, on line 15, it is passed the hello() function for the parameter. Notice that the parentheses are not included after hello. The parentheses tell Lua to “call this function,” but without the parentheses, Lua instead passes the hello() function to the func parameter in announce(). The hello() function is stored in the func parameter, just like an integer or string would be stored in a parameter. Then, on line 11, the function stored inside func is called because it has parentheses: func(). Because hello was passed for the func parameter, the hello() function is called, and the program displays Hello there!.
Later, line 16 will call the announce() function, but this time it will pass goodbye for the func parameter. So, when func() is called on line 11, the code inside the goodbye() function will run and print Goodbye!.
The code in the announce() function hasn’t changed. It just knows that it should call whatever function is passed for its func parameter. Similarly, the sweepField() function we’ll create will call the function passed for its sweepFunc parameter. The buildFloor() function will pass hare.selectAndPlaceDown to sweepField(), making it place blocks beneath the turtle at each space in the rectangular field.
EXTENDING THE HARE MODULE
Because the sweepField() function will be useful to many different programs, we’ll put it in the hare module that we started in Chapter 7. The buildFloor() function, which we’ll also add to the hare module, will call sweepField(). From the command shell, run edit hare. Move the cursor to the bottom of the file and continue the code by entering the following:
hare
...snip...
134. -- sweepField() moves across the rows
135. -- and columns of an area in front and
136. -- to the right of the turtle, calling
137. -- the provided sweepFunc at each space
138. function sweepField(length, width, sweepFunc)
139. local turnRightNext = true
140.
141. for x = 1, width do
142. for y = 1, length do
143. sweepFunc()
144.
145. -- don't move forward on the last row
146. if y ~= length then
147. turtle.forward()
148. end
149. end
150.
151. -- don't turn on the last column
152. if x ~= width then
153. -- turn to the next column
154. if turnRightNext then
155. turtle.turnRight()
156. turtle.forward()
157. turtle.turnRight()
158. else
159. turtle.turnLeft()
160. turtle.forward()
161. turtle.turnLeft()
162. end
163.
164. turnRightNext = not turnRightNext
165. end
166. end
167.
168. -- move back to the start position
169. if width % 2 == 0 then
170. turtle.turnRight()
171. else
172. for y = 1, length - 1 do
173. turtle.back()
174. end
175. turtle.turnLeft()
176. end
177.
178. for x = 1, width - 1 do
179. turtle.forward()
180. end
181. turtle.turnRight()
182.
183. return true
184. end
185.
186.
187. -- buildFloor() builds a rectangular
188. -- floor out of the blocks in the
189. -- inventory
190. function buildFloor(length, width)
191. if countInventory() < length * width then
192. return false -- not enough blocks
193. end
194.
195. turtle.up()
196. sweepField(length, width, selectAndPlaceDown)
197. end
After you’ve entered all of these instructions, save the program and exit the editor. You can also download this module by running pastebin get wwzvaKuW hare.
CALLING THE SWEEPFUNC() FUNCTION
Let’s look at the new hare functions one at a time, starting with sweepField(). All the sweepField() function does is move the turtle across the entire field, calling a function passed in as a parameter once at each space. The length and width parameters tell sweepField() how many rows long and how many columns wide the field is, respectively.
To run sweepFunc() at each space the turtle moves to, we use one for loop to iterate over each column and another for loop to iterate over each row.
hare
134. -- sweepField() moves across the rows
135. -- and columns of an area in front and
136. -- to the right of the turtle, calling
137. -- the provided sweepFunc at each space
138. function sweepField(length, width, sweepFunc)
139. local turnRightNext = true
140.
141. for x = 1, width do
142. for y = 1, length do
143. sweepFunc()
At the end of each column, the turtle alternates between turning to the right and turning to the left, so line 139 sets the turnRightNext variable to true.
The two nested for loops iterate to keep track of which column and row the turtle is on. The x variable keeps track of which column the turtle is on, and the y variable keeps track of which row the turtle is on. When y is equal to length, the turtle is on the last row of its current column. When x is equal to width, the turtle is on the last column of its current row. Figure 13-10 shows the value of x and y at each block as the turtle sweeps the field. Notice that the y value starts at 1 on different sides because the turtle alternates between moving up and down columns.
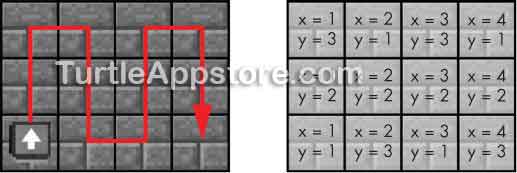
Figure 13-10: The path the turtle moves as it sweeps the field (left) and the values of the x and y variables at each space (right)
Inside the inner for loop, line 143 calls sweepFunc(). Remember that sweepFunc is a parameter, not the name of a function. There is no function sweepFunc() line anywhere in our programs to define a function of that name. Instead, sweepFunc is a parameter that we will set to a function. As a result, any function can be passed to sweepField() and it will be called on line 143 as sweepFunc().
MOVING ALONG THE ROWS AND COLUMNS
After calling sweepFunc(), the turtle needs to move to the next space. The inner for loop that begins on 142 iterates the y variable from 1 to length. The turtle needs to move up or down length - 1 rows for each column, so lines 146 to 148 call turtle.forward() on each iteration of the for loop except for the last iteration (when y will be equal to length).
hare
145. -- don't move forward on the last row
146. if y ~= length then
147. turtle.forward()
148. end
149. end
When the program reaches line 149 and the for loop that started on line 142 finishes, the turtle has reached the last row and the end of the column. If the turtle isn’t yet on the last column (you can tell because x will be equal to width), the turtle needs to move the next column.
The direction the turtle needs to turn in order to move to the next column depends on whether turnRightNext is true or false. (See Figures 13-5 and 13-7 for the different turns the turtle must make.) If turnRightNext is true, lines 155 to 157 make the turtle turn to the right, move forward, and turn to the right again. If turnRightNext is false, lines 159 to 161 make the turtle turn to the left, move forward, and turn to the left again. Either way, the turtle will be at the start of the next column.
hare
151. -- don't turn on the last column
152. if x ~= width then
153. -- turn to the next column
154. if turnRightNext then
155. turtle.turnRight()
156. turtle.forward()
157. turtle.turnRight()
158. else
159. turtle.turnLeft()
160. turtle.forward()
161. turtle.turnLeft()
162. end
163.
164. turnRightNext = not turnRightNext
165. end
166. end
The next time the turtle must turn to the next column, it will have to turn in the other direction, so line 164 toggles the Boolean value in turnRightNext. The end statement on line 165 ends the if statement on line 152, and the end statement on line 166 ends the for loop on line 141. When the execution gets past line 166, the turtle has swept the entire field and is ready to return to the starting space.
FIGURING OUT IF A NUMBER IS EVEN OR ODD WITH THE MODULUS OPERATOR
The turtle must take two different paths to return to its starting space after it finishes sweeping the field. Recall that these paths were shown in Figures 13-8 and 13-9 and that which path the turtle takes depends on whether the field’s width is even or odd. To determine whether a number is even or odd, we need to check whether the number is divisible by 2. When a number is divisible by 2, it’s even. When a number is not divisible by 2 and leaves a remainder of 1, the number is odd.
Therefore, to determine whether a number is even or odd, we just need to find the remainder when we divide the number by two. We can do this by using the modulus operator, or mod operator (%). (This name isn’t related to Minecraft mods.)
Enter the following into the Lua shell to see how the mod operator works:
lua> 6 % 2
0
lua> 7 % 2
1
lua> 8 % 2
0
We use the mod operator like we use the division operator (/): enter the number to divide, the % operator, and the number to divide by (which in this case is 2). Even numbers modded by 2 will always result in 0 because even numbers leave no remainder when divided by 2. Odd numbers modded by 2 will always result in 1.
Using this mod trick, we can determine whether width is an even or odd number.
THE EVEN-WIDTH AND ODD-WIDTH PATHS
The path the turtle must take to return to the starting space differs depending on whether width is even or odd, so we’ll use an if statement.
hare
168. -- move back to the start position
169. if width % 2 == 0 then
170. turtle.turnRight()
171. else
172. for y = 1, length - 1 do
173. turtle.back()
174. end
175. turtle.turnLeft()
176. end
If the width of the field is an even number, then width % 2 will be equal to 0 and the condition for the if statement on line 169 will be true. In that case, line 170 turns the turtle to the right. Otherwise, if the width is odd, lines 172 to 174 move the turtle backward to the other end of the row, and line 175 turns the turtle to the left. In both cases, the turtle will end up at the start of the column, facing left.
Next, lines 178 to 180 move the turtle forward width - 1 spaces to return the turtle to its starting position. To make the turtle face its starting direction, line 181 turns the turtle to the right.
hare
178. for x = 1, width - 1 do
179. turtle.forward()
180. end
181. turtle.turnRight()
182.
183. return true
184. end
At this point, the turtle is back at its starting position, so line 183 returns true. The end statement on line 184 ends the sweepField() function’s code block.
Remember, the sweepField() function isn’t written specifically to build a floor. Instead, we can use the function for many different purposes because it makes a turtle sweep a field while calling a function at each space. To make floors, we’ll create the buildFloor() function.
WRITING THE BUILDFLOOR() FUNCTION
Using the sweepField() function, the buildFloor() function builds a rectangular floor using the blocks in the turtle’s inventory. The buildFloor() function takes length and width variables as arguments to specify how large the floor should be.
hare
187. -- buildFloor() builds a rectangular
188. -- floor out of the blocks in the
189. -- inventory
190. function buildFloor(length, width)
191. if countInventory() < length * width then
192. return false -- not enough blocks
193. end
Line 191 calls countInventory() and compares the number of blocks in the turtle’s inventory to the number of blocks needed to create a floor. A floor that is length blocks long and width blocks wide will require length * width blocks to build. If the turtle doesn’t have enough blocks to build a floor, the function will end.
If the turtle has enough blocks, line 195 moves the turtle up once so the turtle can place the floor blocks underneath itself as it sweeps the field.
hare
195. turtle.up()
196. sweepField(length, width, selectAndPlaceDown)
197. end
Line 196 passes the length, width, and the selectAndPlaceDown function to sweepField(). The call on line 196 tells sweepField() to call the function selectAndPlaceDown() at each space in the field so the turtle places blocks to build the floor.
That’s it for the buildFloor() function. This function is short because most of the work is done by the sweepField() function.
WRITING THE BUILDFLOOR PROGRAM
We put the buildFloor() and sweepField() functions in the hare module so programs can call the functions, but it would still be useful to have a program just for building floors. Just like the buildwall and buildroom programs in Chapters 11 and 12, the buildfloor program will accept command line arguments, provide a usage message, and call hare.buildFloor() to construct the floor or ceiling.
From the command shell, run edit buildfloor and enter the following code:
buildfloor
1. --[[Floor Building program by Al Sweigart
2. Builds a rectangular floor.]]
3.
4. os.loadAPI('hare')
5.
6. -- handle command line arguments
7. local cliArgs = {...}
8. local length = tonumber(cliArgs[1])
9. local width = tonumber(cliArgs[2])
10.
11. if length == nil or width == nil or cliArgs[1] == '?' then
12. print('Usage: buildwall <length> <width>')
13. return
14. end
15.
16. hare.buildFloor(length, width)
After you’ve entered all of these instructions, save the program and exit the editor.
Because buildfloor is so similar to the buildwall and buildroom programs, I won’t explain the code again. The program simply takes command line arguments to determine the length and width of the floor, which the hare.buildFloor() function passes to sweepField().
RUNNING THE BUILDFLOOR PROGRAM
After placing the turtle, right-click the turtle to open its GUI. Load at least 30 stone bricks (or some other building block) into its inventory. From the command shell, run buildfloor 5 6 to watch the turtle build a floor five blocks long and six blocks wide.
After that, you can run buildroom 5 6 4 to build the walls for a room above the floor. And when this room is finished, turning the turtle to the right and running buildfloor 5 6 again will build a flat roof for this room! Now you have everything you need to build rectangular rooms.
If you get errors when running this program, carefully compare your code to the code in this book to find any typos. If you still cannot fix your program, delete the file by running delete buildfloor and then download it by running pastebin get Epr9CndN buildfloor.
CREATING A PATTERNED FLOOR
As mentioned earlier, because the sweepField() function lets us pass any function for its sweepFunc parameter, it’s very flexible. Let’s write a buildcheckerboard program that builds a checkered floor using coal blocks and quartz blocks.
You can craft coal blocks from nine pieces of coal, and you can craft quartz blocks from four pieces of quartz. Figure 13-11 shows these recipes. Note that you can only mine Nether quartz from the Nether (see http://minecraft.gamepedia.com/The_Nether).
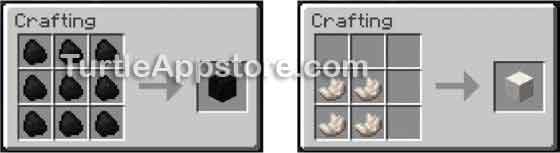
Figure 13-11: Crafting coal blocks (left) and quartz blocks (right)
Because we’re already making a checkered floor, let’s make the floor into a checkerboard so you can play checkers with your turtles in Minecraft!
WRITING THE BUILDCHECKERBOARD PROGRAM
To make an 8 × 8 checkerboard, we’ll need to collect 32 coal blocks and 32 quartz blocks. After we create the buildcheckerboard program, we’ll modify the turtle’s colors so you’ll be able to create an 8 × 8 checkerboard. From the command shell, run edit buildcheckerboard and enter the following code:
buildcheckerboard
1. --[[Checkerboard Building program by Al Sweigart
2. Builds a checkerboard floor.]]
3.
4. os.loadAPI('hare')
5.
6. -- handle command line arguments
7. local cliArgs = {...}
8. local length = tonumber(cliArgs[1])
9. local width = tonumber(cliArgs[2])
10.
11. if length == nil or width == nil or cliArgs[1] == '?' then
12. print('Usage: buildcheckerboard <length> <width>')
13. return
14. end
15.
16. local placeBlack = true
17.
18. function placeCheckerboard()
19. -- select coal or quartz, based on placeBlack
20. if placeBlack then
21. hare.selectItem('minecraft:coal_block')
22. else
23. hare.selectItem('minecraft:quartz_block')
24. end
25.
26. turtle.placeDown()
27. placeBlack = not placeBlack
28. end
29.
30. turtle.up()
31. hare.sweepField(length, width, placeCheckerboard)
After you’ve entered all of these instructions, save the program and exit the editor.
RUNNING THE BUILDCHECKERBOARD PROGRAM
Place the 32 coal blocks and 32 quartz blocks into the turtle’s inventory, and then run buildcheckerboard 8 8 from the command shell. The turtle will start creating an 8 × 8 checkerboard floor, which you can see in Figure 13-12.
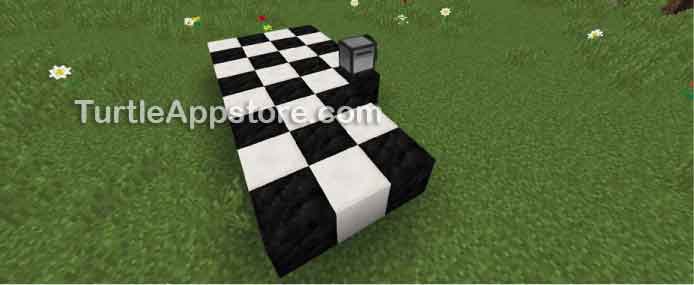
Figure 13-12: The turtle in the process of making the checkerboard floor
If you get errors when running this program, carefully compare your code to the code in this book to find any typos. If you still cannot fix your program, delete the file by running delete buildcheckerboard and then download it by running pastebin get QQQK3mqk buildcheckerboard.
Although we made the buildCheckerboard program to make a checkered floor the size of a standard-sized checkerboard, you can actually create checkered floors of any size now. These can be part of a fancy castle floor, as shown in Figure 13-13.
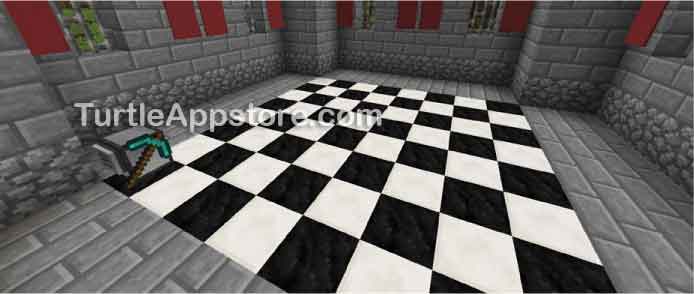
Figure 13-13: A turtle-built checkered floor in a turtle-built castle
Or, if you create 24 turtles and hold either rose red dye or bone meal while right-clicking the turtles to dye them red or white, respectively, you can create a checkers set, as shown in Figure 13-14.
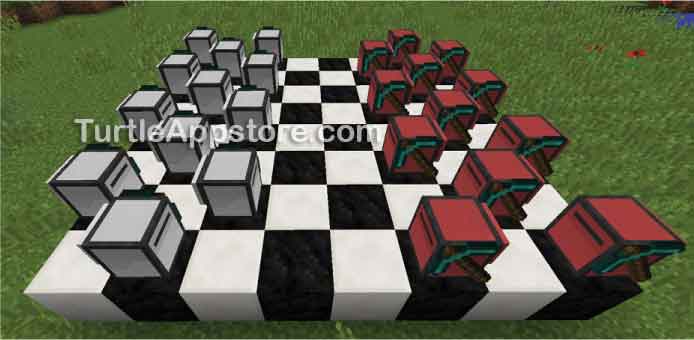
Figure 13-14: A checkerboard of turtles
Even building a giant 32 × 32 checkered floor, as shown in Figure 13-15, is easy when a turtle makes it for you.
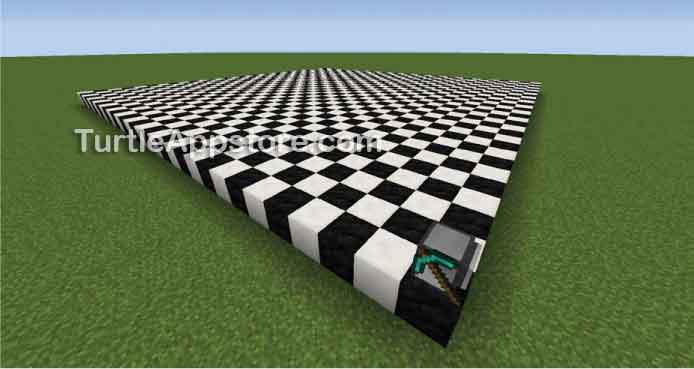
Figure 13-15: A turtle-built 32 × 32 checkered floor
WRITING THE PLACECHECKERBOARD() FUNCTION
Unlike the hare.selectAndPlaceDown() function, which simply selects any slot with items in it before placing a block down, the placeCheckerboard() function looks at the placeBlack variable to determine whether to select a coal block or a quartz block.
The placeBlack variable is first created with a local statement on line 16, outside of all functions.
buildcheckerboard
16. local placeBlack = true
The placeCheckerboard() function checks if this variable is true or false to decide which block the turtle should select.
buildcheckerboard
18. function placeCheckerboard()
19. -- select coal or quartz, based on placeBlack
20. if placeBlack then
21. hare.selectItem('minecraft:coal_block')
22. else
23. hare.selectItem('minecraft:quartz_block')
24. end
25.
26. turtle.placeDown()
When placeBlack is true, the program calls hare.selectItem() to select an inventory slot containing coal blocks. When placeBlack is false, the program instead selects an inventory slot containing quartz blocks.
After the if and else statements specify which block type to select with the hare.selectItem() function, line 26 places the selected block type below the turtle.
Then line 27 toggles the Boolean value stored in placeBlack.
buildcheckerboard
27. placeBlack = not placeBlack
28. end
If placeBlack was true, now it will be false. If placeBlack was false, now it will be true. This means that the next time placeCheckerboard() is called by the sweepField() function, the opposite-color block will be placed. This code produces the checkered pattern.
CALLING THE SWEEPFIELD() FUNCTION
After the placeCheckerboard() function ends on line 28, the main part of the program continues. Line 30 moves the turtle up one space so it has room to place blocks below it.
buildcheckerboard
30. turtle.up()
31. hare.sweepField(length, width, placeCheckerboard)
It then calls hare.sweepField(), passing in the command line arguments as length and width. It also passes in the placeCheckerboard function as a value, which has no parentheses after it because the program isn’t calling the placeCheckerboard() function but is rather passing in the function.
WHAT YOU LEARNED
In this chapter, we created a generic sweep field algorithm that has the turtle visit each space in a rectangle and perform an action. The buildfloor program uses this algorithm to build floors and ceilings, but you can apply the algorithm to many different kinds of tasks. This is possible because Lua lets you pass functions to other functions just as easily as you pass string or integer values. When the selectAndPlaceDown() function was passed to sweepField() in the buildfloor program, the turtle built a floor. But when the more specialized placeCheckerboard() function was passed to sweepField() in the buildCheckerboard program, the turtle built a checkered floor.
Because the sweepField() function is so adaptable, it doesn’t take much additional code to program new behaviors. In Chapter 14, we’ll use the sweepField() function to create an automated farm to do all your planting and harvesting chores for you.